Thanksgiving went by without a hitch. The table was beautifully set, the house cleaned and scrubbed, and the food was delicious. We had family surrounding our dining room table, and we had a nice visit afterward.
Friday, we received some terrible news. . .Brandon's grandmother--who was just here the day before, helping me cook and then clean all the dishes (the dishes had to be hand-washed)--had blacked out and fallen down her basement stairs while carrying her vacuum cleaner. Turns out, she had anemia (no one knew, not even she!) and it caused a brain aneurysm, making her black out. Her fall caused severe neck damage, and she never regained consciousness (as far as I know). A few hours later, she was gone. It was such a shock, since she was the healthiest out of all of our (mine and Brandon's) grandparents combined. The uncertainty we have now is, who will continue to take care of Clair, her husband? Right now, her sister is taking care of him. We are to drive to Bellefontaine tomorrow by 1 to be with family for the viewing times, and then again on Wednesday for the funeral.
In the midst of all this, minutes after receiving the first telephone call, I received a call from one of my dearest friends...she's expecting! Yay! A new baby to spoil! (Her name is withheld because not everyone knows yet...If you think you know who it is, try guessing again because I have several friends who might possibly fit the bill!!)
Needless to say, Friday was one of mixed emotions. I've been helping Brandon adjust to his grandmother's passing, and I've had to really restrain myself from truly bouncing off the wall over my friend's good news.
Despite all this excitement, I've been working on various gifts for the next few weeks. I finished my FIL's afghan for his birthday (yippee!), which he's been waiting on for a while now. I started both of my SILs' Christmas gifts, and began several sock monkey hats for my cousins and various friends for Christmas. Also on my to-do list are snowflakes, dishcloths, and another afghan for a friend who purchased the yarn. I keep praying that I get everything done and fast!!
I borrowed some Gooseberry Patch books from the library, and one of them had a great idea for recycling felted wool sweaters--you know, those sweaters that seem to shrink every time you wash them, only for you to discover they were wool and should have been hand-washed? Turns out, you felt them even more, turn them inside out, and cut out a stocking shape, using the neck of the sweater as the cuff of the stocking. You sew the sides together, turn right-side-out, and embellish as you desire. I think cabled ones would look wonderful! I think I just might use this idea for next Christmas, gathering up wool sweaters from thrift stores over the year and felting them for stockings. Hmmmm...
Well, I need to go. Since Brandon's off for bereavement leave, we're going shopping to find him some appropriate clothing for the next 2 days--his suit no longer fits!
Monday, November 27, 2006
Saturday, November 18, 2006
Broccoli Bobble Bag Pattern

Okay, I decided to post the pattern here, so it goes along with the pics of the bag in my previous post. A couple of my friends and I were looking at it during the OSU Buckeyes vs Michigan game, and decided it looks like an upside-down broccoli spear, and since we like VeggieTales, I thought, why not? Hence, the name. Remember, since this will be felted, it will be HUGE as it is being worked up. I believe mine was about 2 1/2-3' long and about 4-6" wide.
You will need:
- 100% wool yarn--I used maybe 3 skeins of Bear Brand "Town 'n' Country" 2-ply which came in 2-pk 1.5-oz. skeins, and the other color came from a cone of Peruvian wool. I had purchased them from a thrift store on separated occasions, so some of them were used. I think different color mixes would make a great felted bag!
- US Size P hook
- Washing machine w/ hot wash/cold rinse cycle
- Cotton pillow case (not flannel, because it will pill)
- 3 yds. 1"-wide gross-grain ribbon
Ch 42.
Rnd 1: 2dc in 3rd ch from hook, and dc across, 3dc in last ch, dc across on other side of foundation ch, join to top of turning ch. Ch 3, do not turn.
Rnd 2: Dc around. Join in 3rd ch of turning ch, ch 3.
Rnd 3: Dc in next 3 sts, *work a 4-dc bobble [(yo, insert hook, yo, pull hook through, yo, pull hook through first two loops) 4 times, yo, pull through all 5 loops on hook--3-dc bobbles will have one less] in next 2 dc, dc in next 4 dc. Rep from * across to where the the piece begins to curve around to the back. There should be 7 groups of 2 4 dc bobbles. Dc around to beginning of round. Join, ch 3.
Rnd 4: Dc in next 3 sts, work a 4-dc bobble in top of next 2 bobbles, dc in next 4 sts, (work 4-dc bobbles in top of next 2 bobbles, sk next dc, dc in next 3 dc) 4 times, work 4-dc bobbles in next 2 dc, dc in next 4 dc, work 4-dc bobbles in next 2 dc, (dc in next 8 dc, dc2tog) to end of rnd. Join, ch 3.
Rnd 5: Dc in next dc, dc2tog, work 4-dc bobbles in next 2 bobbles, sk next dc, dc in next 3 dc, work 4-dc bobbles in next 2 bobbles, (sk next dc, dc in next 2 dc, work 4-dc bobbles in next 2 bobbles) 4 times, sk next dc, dc in next 3 dc, work 4-dc bobbles in next 2 bobbles, (dc in next 6 dc, dc2tog) to end of rnd. Join, ch 3.
Rnd 6: Dc in next 2 dc, work 4-dc bobbles in bobbles, sk next dc, dc in next 2 dc, work 4-dc bobbles in next 2 bobbles, (sk next dc, dc in next dc, work 4-dc bobbles in next 2 bobbles) 4 times, sk next dc, dc in next 2 dc, work 4-dc bobbles in next two bobbles, (dc in next 5 dc, dc2tog) around to end. Join, ch 3.
Rnd 7: Dc 2 tog, work 3-dc bobbles in bobbles, sk next dc, dc in next dc, (work 3-dc bobbles in next 2 bobbles, sk next dc) 5 times, dc in next dc, work 3-dc bobbles in next 2 bobbles, dc across to end. Join, ch 3.
Rnd 8: Dc in next dc, work 3-dc bobbles in next 2 bobbles, sk next dc, work 3-dc bobbles across to dc, sk next dc, work 3-dc bobbles in next 2 bobbles, dc across to end. Join, ch 2.
Rnd 9: Work 3-hdc bobbles [(yo, insert hook, yo, pull through) 3 times, yo, pull through all loops on hook] across to dc section, hdc across to end. Join, ch 2.
Rnd 10: Rep Rnd 9, only w/ 2-hdc bobbles. Join, ch 1.
Rnd 11: Sc around. Join, ch 4.
Rnd 12: Sk 1 sc, dc in next sc, (ch 1, sk next sc, dc in next st) around. Join, ch 1.
Rnd 13: Sc in ea ch-1 sp and ea dc around. Join, fasten off.
By now, the bag should be about 2 1/2-3" across. Place your bag into a cotton (not flannel, as it will pill) pillow case, and place in your washing machine. Do not put anything else in there with it, as I found out the hard way! (I'm still picking of the thousands of little 'fuzzies'!) Throw a little laundry soap in (I just used my Tide), and set your machine on the longest setting with a Hot Wash/Cold Rinse. Once it's finished, you just take it out, and lay it on a flat surface to dry. You may even try hanging it on a plastic coat hanger, and hanging it for a day on your shower rod.
Cut your ribbon into three equal pieces. Weave one of the pieces through the eyelets of the bag and tie it in a bow. Take a second piece of ribbon and tie it around the post of one of the eyelets, with the tail leading downward, and tie the other end to the opposite end of the same side of the bag. Repeat this step with the third piece of ribbon. If you like, you can just weave the first ribbon through the eyelets and sew the tails to the inside of the bag and attach a pretty pin to the outside. Line your bag, if you desire, and you can even add a zipper (this will be easier to do if you line your bag at the same time!). Voila! Enjoy your new toy!
Friday, November 17, 2006
My Latest Creation!!
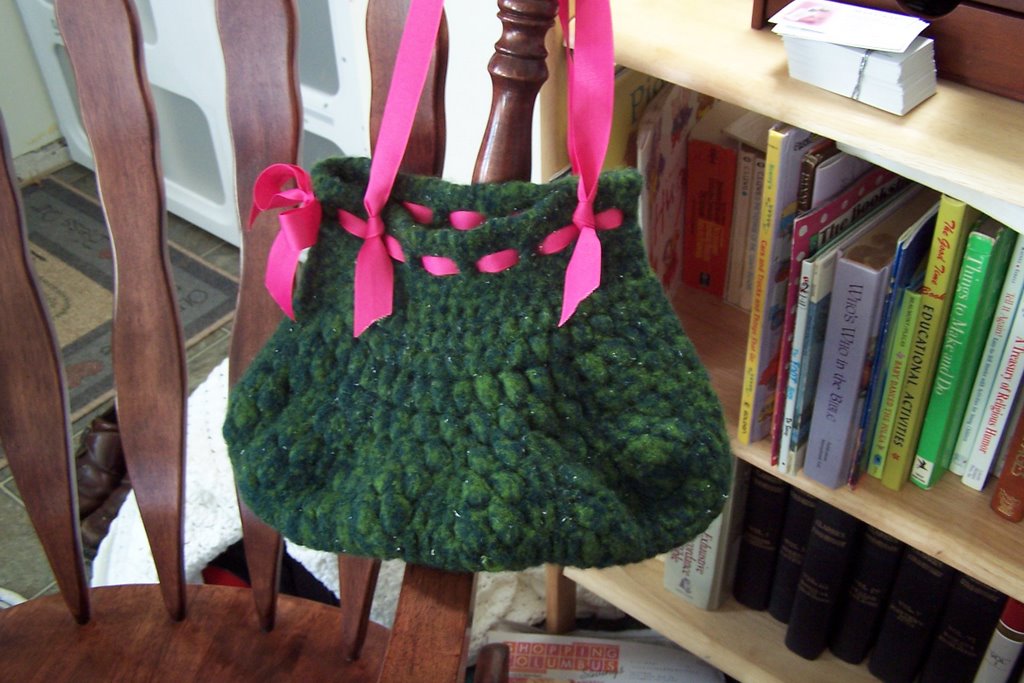

I started this last night at bible study (I can't just sit still...My hands have to be doing something, and I was praying with every stitch!). I plan to give it as a Christmas gift. It's my first felted project, and I will have the pattern typed up soon. I really like this bag so much, that I'm going to have to make one for myself when I get the time!! (I really have too many WIPs to work on at the moment!!
I used 100% wool yarn that I bought at a thrift store, working with two shades of green at the same time with a P hook. After I finished it, I felted it and let it dry flat (there really wasn't any other way to do it). I wove the fuchsia gross-grain ribbon through some beading at the top, and also used the same type of ribbon for handles. When I make my own, I might use a different color of ribbon, if I can find some in the color I'm imagining (I'm thinking a chocolate brown grossgrain, in a 1" width).
Thursday, November 02, 2006
Wow! Two Posts In One Week!!
I haven't done this since my first couple weeks of writing this blog!! I must laugh at myself, though, because even though I am a SAHM, I would have thought I'd have more time to blog...*smacks forehead* What was I thinking?!?! I'm running after my 11-month-old, cleaning, cooking, crocheting, etc.
I started on the tunic for the bishop christening gown...Not sure yet what to call it, though...The sketch I drew looks quite pretty (although I'm no sketch-artist) and the squares are coming along quite nicely. I found two compatible pineapple squares at Celt's Vintage Crochet, which, when worked in #10 thread, come out to 3" and 6", respectively. They line up fairly well, too. Needless to say, I was rather excited about the match. Once the tunic is finished, I'm going to have to ask my mom to show me how to make a decent pattern with an existing garment. As I said before in a previous post, I found a couple vintage bishop-style dresses at a yard sale. The dresses are short (probably come to the knees or just above on a 1-yr-old), so I need to make the pattern quite a bit longer. The dress has smocking on the top, so maybe I could design a simple crocheted bodice? I don't know...We'll have to see. Perhaps soon I can work up a simple pattern for testing, but I don't know how that works since they're someone else's squares I'm using. Maybe I can just make the garments myself and sell them that way, or give credit in a short bibliography either at the beginning or the end of the pattern. I hope my dh has a program here on our pc that will allow me to "draw" the schematics for the dress...that or do some fancy rigging and repeat the squares in order that someone could duplicate the pattern as well in case I need assistance in making more for sales.
I hope sales pick up soon...I had to remove my Garcelle dresses from Rue de Lily in Powell because Karyn needed more room in the shop for her Christmas items. I want to sell dresses and also sell the pattern, but I need to research some more in order to establish a lulu or an etsy account. I've had encouragement from Drew the Crochet Dude to work with lulu.com because the publishing is easy and they don't charge much...I also probably need to get a ProPay or PayPal account so I can collect fees for the patterns, but I'm not sure I want to do that...Right now, I think I'd rather just have people send me the money via snail-mail, so I may just stick with that for the time being.
Wednesday, November 01, 2006
My Journal
Alright...I made good on my idea to make a WIP journal...It's also my design journal...Although, up until today, I haven't put in any dates. *embarrassed grin* Lol. So far, I have my design of the Anona dress, plus, I found a bobbin lace tunic online...shouldn't be too hard to duplicate with crocheted motifs. I plan to miniaturize it to make a lace tunic for another Christening dress design I have in mind...perhaps make a bishop-style dress out of muslin, and work the tunic to put on top of it? We'll have to see. . . I found the perfect pineapple square for it, though! My dd and I went to a yard sale at a local church a couple weeks ago, and found some vintage little girls' bishop dresses, complete with smocking...I was thinking of using them as guides for the underdress pattern, making them with long sleeves instead of the short sleeves they have, while the tunic would have short sleeves with a couple pineapple motifs going around them. The pineapple squares would be the bodice, and hem of the skirt...Oooh! Wouldn't this also be pretty made with an organza or tulle skirt? Hmm...
I also have in it my Garcelle patterns, my outlines for the Stargate afghan pattern I'm also currently working on for a gal at Crochetville. It's amazing what one comes up with while watching television!! I also have in it schematics for other things, like the teapot pattern I've been working on for almost 2 1/2 years (still can't quite get it looking right), among other things.
This journal I hope to pass on to my children someday...all of them (once they're born and old enough) will learn to crochet, knit, and sew--even the boys (much to the chagrin of our more masculine friends). I also have probably about 1,000 or more patterns I've pulled off the web or J-hooks at stores, as well as many books that I have to pass on. My dd is our only child so far, and she seems to be interested in the yarn, thread, and hooks Momma 'plays' with all the time...in fact, she helps me out by pulling it out of the skein or off the ball...Sometimes, she even helps me FROG my work, even when it doesn't need it!! Lol.
Well, my friends, I must go... the thought of the bishop dress is intriguing, so I'm going to work on another square to see if I can put them together!!
Subscribe to:
Posts (Atom)